Simulating devices with Native Simulator
Install Dependencies and West
Install Dependencies
- Linux
- MacOS
- Windows
-
Install dependencies with
apt:sudo apt update
sudo apt install --no-install-recommends git cmake ninja-build gperf \
ccache dfu-util device-tree-compiler wget python3-dev python3-pip \
python3-setuptools python3-tk python3-venv python3-wheel xz-utils file \
make gcc gcc-multilib g++-multilib libsdl2-dev -
West requires CMake version 3.20.0 or higher. Check the version that your package manager installed:
$ cmake --version
cmake version 3.16.3
If you have an older version, Ubuntu 20.04 systems can add the Kitware repository which maintains the newest release:
wget -O - https://apt.kitware.com/keys/kitware-archive-latest.asc 2>/dev/null | sudo apt-key add -
sudo apt-add-repository 'deb https://apt.kitware.com/ubuntu/ focal main'
sudo apt update
sudo apt install cmake
cmake --version
If the Kitware repository doesn't work for you (ie: your system is not running Ubuntu 20.04), you can build the stable version of CMake from source.
Install West
We recommend creating a python3 virtual environment to avoid running into
tooling incompatibilities.
- Install within a virtualenv
- Install globally
-
Create your workspace directory:
mkdir ~/golioth-zephyr-workspace -
Create a new virtual environment:
Even though we haven't pulled down Zephyr yet, we can create the virtual environment in the place where we will pull down Zephyr.
python3 -m venv ~/golioth-zephyr-workspace/.venv -
Activate the virtual environment:
source ~/golioth-zephyr-workspace/.venv/bin/activateWhenever the virtual environment is active, your shell's prompt will be prefixed with
(.venv).Deactivate the virtual environment when you're done by running
deactivate.noteAnytime you need to use west or Zephyr, remember to re-activate the virtual environment.
-
Now, use
pipto installwest(beginning with thewheeldependency):Because we're in a
python3virtualenv, we don't need to specifypip3and can just usepip(because virtual env knows the best version to use)pip install wheel
pip install west
-
Create your workspace directory:
mkdir ~/golioth-zephyr-workspace -
Use
pip3to installwest(beginning with thewheeldependency):pip3 install wheel
pip3 install west
-
Start by installing dependencies with
brew:brew install cmake ninja gperf python3 ccache dtc
Install West
We recommend creating a python3 virtual environment to avoid running into
tooling incompatibilities.
- Install within a virtualenv
- Install globally
-
Create your workspace directory:
mkdir ~/golioth-zephyr-workspace -
Create a new virtual environment:
Even though we haven't pulled down Zephyr yet, we can create the virtual environment in the place where we will pull down Zephyr.
python3 -m venv ~/golioth-zephyr-workspace/.venv -
Activate the virtual environment:
source ~/golioth-zephyr-workspace/.venv/bin/activateWhenever the virtual environment is active, your shell's prompt will be prefixed with
(.venv).Deactivate the virtual environment when you're done by running
deactivate.noteAnytime you need to use west or Zephyr, remember to re-activate the virtual environment.
-
Now, use
pipto installwest(beginning with thewheeldependency):Because we're in a
python3virtualenv, we don't need to specifypip3and can just usepip(because virtual env knows the best version to use)pip install wheel
pip install west
-
Create your workspace directory:
mkdir ~/golioth-zephyr-workspace -
Use
pip3to installwest(beginning with thewheeldependency):pip3 install wheel
pip3 install west
Package Manager: Chocolatey
The chocolatey package manager needs to be installed
to fetch software packages required by Zephyr. These instructions must be run in
a cmd.exe command prompt. The required commands differ on PowerShell.
-
Open an Administrator
cmd.exewindow:- press the Windows key
- type
cmd.exe - right-click the result, and choose
Run as Administrator
-
Disable global confirmation to avoid having to confirm the installation of individual programs:
choco feature enable -n allowGlobalConfirmation -
Use
chocoto install the required dependencies:choco install cmake --installargs 'ADD_CMAKE_TO_PATH=System'
choco install ninja gperf python git dtc-msys2 wget 7zip -
Close the window and open a new
cmd.exewindow as a regular user to continue
Install West
west is the Zephyr "meta tool" that will allow you to build firmware, install
packages, and flash firmware. There are various dependencies required, depending
upon your operating system (OS), because west is Python based.
- Install within a virtualenv
- Install globally
-
Create your workspace directory:
cd %HOMEPATH%
mkdir golioth-zephyr-workspace -
Create a new virtual environment:
cd %HOMEPATH%
python -m venv golioth-zephyr-workspace\.venv -
Activate the virtual environment:
## cmd.exe
golioth-zephyr-workspace\.venv\Scripts\activate.bat

## PowerShell
golioth-zephyr-workspace\.venv\Scripts\Activate.ps1
Once activated your shell will be prefixed with
(.venv). The virtual environment can be deactivated at any time by runningdeactivate.noteRemember to activate the virtual environment whenever you need to use the
westcommand. -
Install west:
Now, use
pipto installwest.pip install west
-
Create your workspace directory:
cd %HOMEPATH%
mkdir golioth-zephyr-workspace -
Use
pip3to installwest:pip install -U west
Install Golioth Firmware SDK
- Linux
- MacOS
- Windows
-
With
westinstalled, grab the Zephyr SDK:cd ~
west init -m https://github.com/golioth/golioth-firmware-sdk.git --mr v0.22.0 --mf west-zephyr.yml ~/golioth-zephyr-workspace
cd golioth-zephyr-workspace/modules/lib/golioth-firmware-sdk
git submodule update --init --recursive
west updateinfoDepending on your internet and I/O speed,
west updatecan take upwards of 5 or 10 minutes. -
Tell
westto automatically configure CMake:west zephyr-export -
Install the remaining dependencies:
- Install within a virtualenv
- Install globally
pip install -r ~/golioth-zephyr-workspace/zephyr/scripts/requirements.txtpip3 install -r ~/golioth-zephyr-workspace/zephyr/scripts/requirements.txt
-
With
westinstalled, download the Zephyr SDK:cd c:\
west init -m https://github.com/golioth/golioth-firmware-sdk.git --mr v0.22.0 --mf west-zephyr.yml golioth-zephyr-workspace
cd golioth-zephyr-workspace/modules/lib/golioth-firmware-sdk
git submodule update --init --recursive
west updateinfoDepending on your internet and I/O speed,
west updatecan take upwards of 5 or 10 minutes. -
Tell
westto automatically configure CMake:west zephyr-export -
Install the remaining dependencies:
- Install within a virtualenv
- Install globally
pip install -r %HOMEPATH%\golioth-zephyr-workspace\zephyr\scripts\requirements.txtpip3 install -r %HOMEPATH%\golioth-zephyr-workspace\zephyr\scripts\requirements.txt
Toolchain check
If you've been using some of the other tutorials on this site, you may have been changing the toolchain, specifically if you used the ESP32. Type the following:
export -p | grep "ZEPHYR"
This should list the following variable
ZEPHYR_TOOLCHAIN_VARIANT
If these are set to Espressif, change them to use the default zephyr toolchain (part of the SDK you installed above)
- Linux
- Mac OS
- Windows
On Linux we compile (non-Espressif) Zephyr using the Zephyr SDK. Do you have that installed? If not, go check out this page on the Zephyr getting started docs.
export ZEPHYR_TOOLCHAIN_VARIANT=zephyr
export ZEPHYR_SDK_INSTALL_DIR=~/zephyr-sdk-x.y.z
Be sure to fill in the sdk name that matches your Zephyr SDK install!
As stated in the Zephyr Getting Started Guide, the toolchains are more manual for Mac and Windows
For ARM based components, you will need to install the GNU ARM Embedded toolchain somewhere on your machine and then point to it. It will likely look something like this:
export ZEPHYR_TOOLCHAIN_VARIANT=gnuarmemb
export GNUARMEMB_TOOLCHAIN_PATH=/home/you/Downloads/gnu_arm_embedded
As stated in the Zephyr Getting Started Guide, the toolchains are more manual for Mac and Windows
For ARM based components, you will need to install the GNU ARM Embedded toolchain somewhere on your machine (the recommendation is at c:\ for windows, hello 1995) and then point to it. It will likely look something like this:
export ZEPHYR_TOOLCHAIN_VARIANT=gnuarmemb
export GNUARMEMB_TOOLCHAIN_PATH=C:\gnu_arm_embedded
Build for Native Simulator
2-zephyr-quickstart/4-simulating-devices-native-sim.md
At this point, you can build a Golioth Zephyr project:
west build -b native_sim/native/64 samples/hello -p
and run it:
./build/zephyr/zephyr.exe
The program will create a pseudo-terminal and print its name (e.g.):
uart connected to pseudotty: /dev/pts/1
You can use screen or a similar program of your choice to connect to the
interactive shell:
screen /dev/pts/1
Setting Credentials
You must set Golioth credentials for the example to authenticate with Golioth. The SDK samples store credentials in the Zephyr Settings subsystem, and these can be set through the shell:
uart:~$ settings set golioth/psk-id <YOUR-PSK-ID>
uart:~$ settings set golioth/psk <YOUR-PSK>
How to find credentials
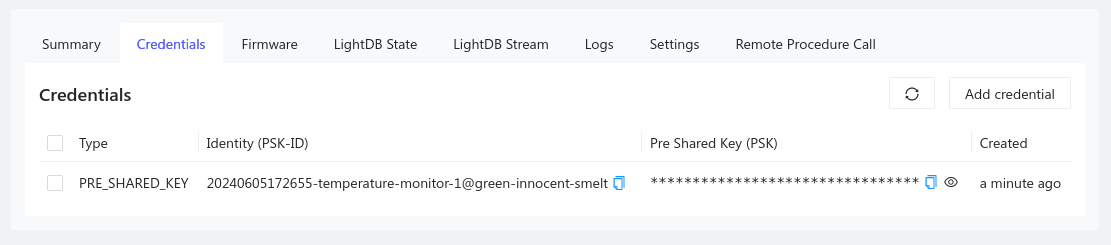
- Golioth credentials are available in the
Credentialstab for your device- Open the Golioth Console
- Select
Deviceson the left sidebar and choose your device from the resulting list - Click on the
Credentialstab and copy yourPSK-IDandPSK
For more on networking, see the native_sim page on the Zephyr Docs
Example Output
After setting credentials, you can view program output either in the pseudo-terminal or on stdout. It should look similar to the following:
WARNING: Using a test - not safe - entropy source
uart connected to pseudotty: /dev/pts/1
*** Booting Zephyr OS build 7823374e8721 ***
*** Golioth Firmware SDK v0.17.0-65-g3634d7e1d392 ***
[00:00:00.000,000] <inf> golioth_settings_autoload: Initializing settings subsystem
[00:00:00.000,000] <inf> fs_nvs: 4 Sectors of 4096 bytes
[00:00:00.000,000] <inf> fs_nvs: alloc wra: 0, fb0
[00:00:00.000,000] <inf> fs_nvs: data wra: 0, 6d
[00:00:00.000,000] <inf> golioth_settings_autoload: Loading settings
[00:00:00.000,000] <inf> net_config: Initializing network
[00:00:00.000,000] <inf> net_config: IPv4 address: 192.0.2.1
[00:00:00.000,000] <dbg> hello_zephyr: main: start hello sample
[00:00:00.000,000] <inf> golioth_mbox: Mbox created, bufsize: 1848, num_items: 10, item_size: 168
[00:00:00.320,003] <inf> golioth_coap_client_zephyr: Golioth CoAP client connected
[00:00:00.320,003] <inf> hello_zephyr: Sending hello! 0
[00:00:00.320,003] <inf> hello_zephyr: Golioth client connected
[00:00:00.320,003] <inf> golioth_coap_client_zephyr: Entering CoAP I/O loop
[00:00:05.330,000] <inf> hello_zephyr: Sending hello! 1
[00:00:10.340,000] <inf> hello_zephyr: Sending hello! 2
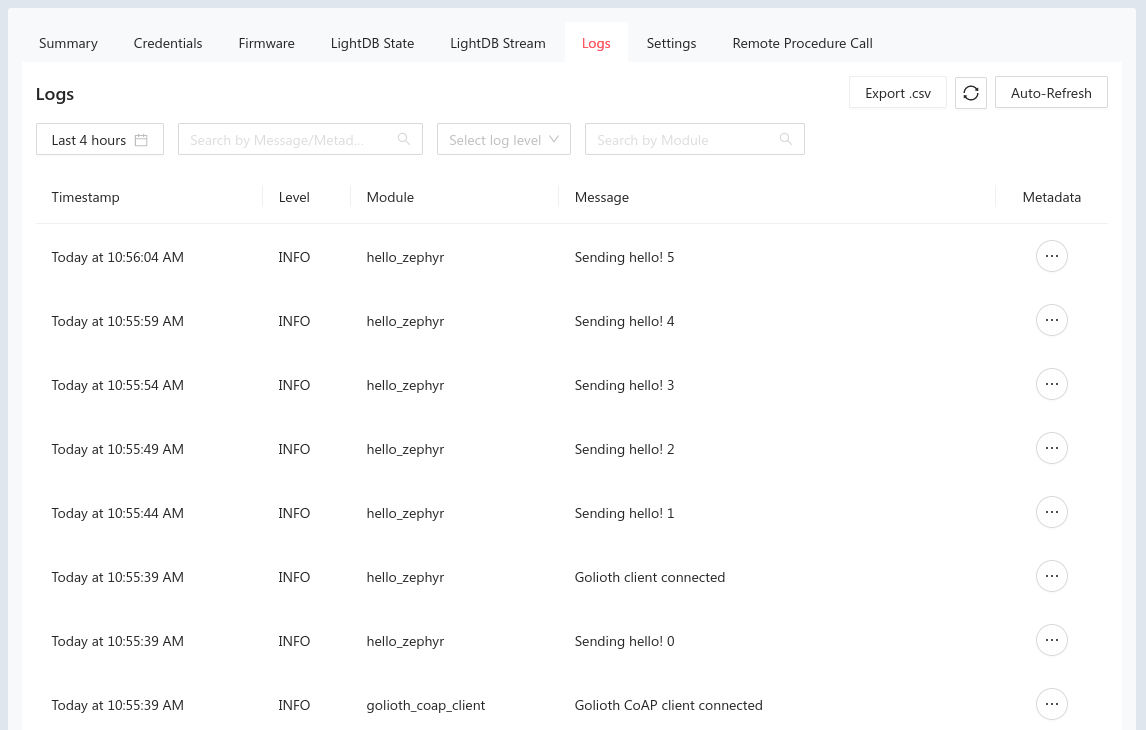
You can confirm this connection by viewing the Status section of the summary page for your device in the Golioth web console. You will also see the hello messages listed in the Log tab:
Additional Golioth Example Code
Congratulations on running the Hello app! The same process may be used to run other Golioth example applications. Be sure to reference the README file for each for detailed configuration and usage information.
- certificate_provisioning: Use certificate authentication
- firmware_update: Use Golioth over-the-air (OTA) firmware update
- hello: Connect and send hello logging messages
- lightdb: Set, get, and observe stateful data between device and cloud
- location: Use network information to determine device location
- logging: Demonstrate logging messages of each different log level
- rpc: Issue a remote procedure call (rpc) and received data back from device
- settings: Demonstrate fleet-wide device settings service
- stream: Send time-series data from device to cloud