Flashing with samples
The Golioth Firmware SDK includes a number of Zephyr example
applications
to demonstrate each of our services. In this section we'll build the hello
sample which connects to Golioth and sends "Hello Golioth! n" messages to our
remote logging service.
This same configure→build→flash process may be applied to all of the other Golioth Zephyr example apps.
Hardware choices
These examples can be built for any hardware supported by Zephyr. However, each will need some device-specific configuration. Golioth maintains configurations for a range of development boards as part of our continuous integration (CI).
- Nordic nRF52840 DK using an ESP32 as an AT modem (details)
- NXP i.MX 1024 Evaluation Kit
- ESP32 DevKitC WROVER
- RAK5010 WisTrio NB-IoT Tracker Pro (Quectel BG95-M3)
This page includes build commands for these boards. You may model configuration
for your own target hardware on the configuration and overlay files found in the
boards directory of each example application.
Build the hello code example
Navigate to the workspace installed in the previous section to ensure your virtual environment is activated before moving to the Golioth Firmware SDK folder:
- Linux
- MacOS
- Windows
cd ~/golioth-zephyr-workspace
source .venv/bin/activate
cd modules/lib/golioth-firmware-sdk
cd ~/golioth-zephyr-workspace
source .venv/bin/activate
cd modules/lib/golioth-firmware-sdk
cd c:\golioth-zephyr-workspace
.venv\Scripts\activate.bat
cd modules\lib\golioth-firmware-sdk
Build the firmware and flashing the device
- Nordic nRF52840
- NXP FRDM-RW612
- ESP32
- RAK5010
west build -b nrf52840dk/nrf52840 examples/zephyr/hello
west flash
west build -b frdm_rw612 examples/zephyr/hello
west flash
west build -b esp32_devkitc_wrover/esp32/procpu examples/zephyr/hello
west flash
You will need an external programmer to flash the RAK5010. There are many options, including J-Link, BlackMagic Probe, and using the offboard debug header on an nRF9160dk.
For this example we've connected a J-Link programmer.
west build -b rak5010 examples/zephyr/hello
west flash -r jlink
Setting Credentials
You must set Golioth credentials (and if necessary, WiFi credentials) for the example to authenticate with Golioth. The SDK samples store credentials in the Zephyr Settings subsystem, and these can be set through the shell:
uart:~$ settings set golioth/psk-id <YOUR-PSK-ID>
uart:~$ settings set golioth/psk <YOUR-PSK>
uart:~$ settings set wifi/ssid <YOUR-WIFI-SSID>
uart:~$ settings set wifi/psk <YOUR-WIFI-PASSWORD>
How to find credentials
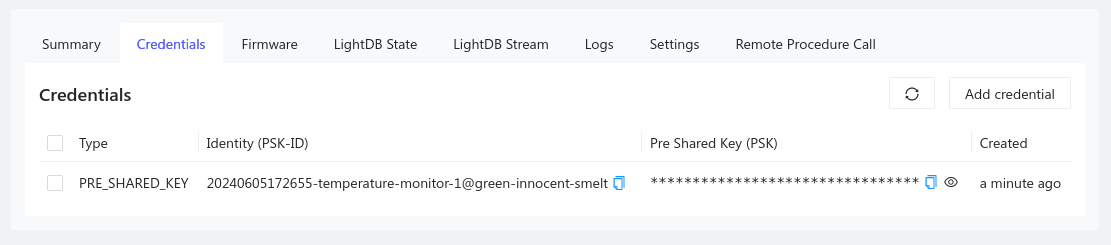
- Golioth credentials are available in the
Credentialstab for your device- Open the Golioth Console
- Select
Deviceson the left sidebar and choose your device from the resulting list - Click on the
Credentialstab and copy yourPSK-IDandPSK
- If your device connects via WiFi, you will need the
SSIDandPSKof your wireless access point.
Example Output
View output from your device by opening a serial terminal (115200 8N1). The result should be a successful connection to Golioth.
*** Booting Zephyr OS build zephyr-v3.4.0-553-g40d224022608 ***
[00:00:00.020,000] <inf> net_config: Initializing network
[00:00:00.020,000] <inf> net_config: IPv4 address: 192.0.2.1
[00:00:00.020,000] <dbg> hello_zephyr: main: start hello sample
[00:00:00.020,000] <inf> golioth_samples: Waiting for interface to be up
[00:00:00.020,000] <inf> golioth_mbox: Mbox created, bufsize: 1100, num_items: 10, item_size: 100
[00:00:00.070,000] <inf> golioth_coap_client: Start CoAP session with host: coaps://coap.golioth.io
[00:00:00.070,000] <inf> golioth_coap_client: Session PSK-ID: your-device-id@your-golioth-project
[00:00:00.070,000] <inf> golioth_coap_client: Entering CoAP I/O loop
[00:00:01.260,000] <inf> golioth_coap_client: Golioth CoAP client connected
[00:00:01.260,000] <inf> hello_zephyr: Sending hello! 0
[00:00:01.260,000] <inf> hello_zephyr: Golioth client connected
[00:00:06.270,000] <inf> hello_zephyr: Sending hello! 1
[00:00:11.280,000] <inf> hello_zephyr: Sending hello! 2
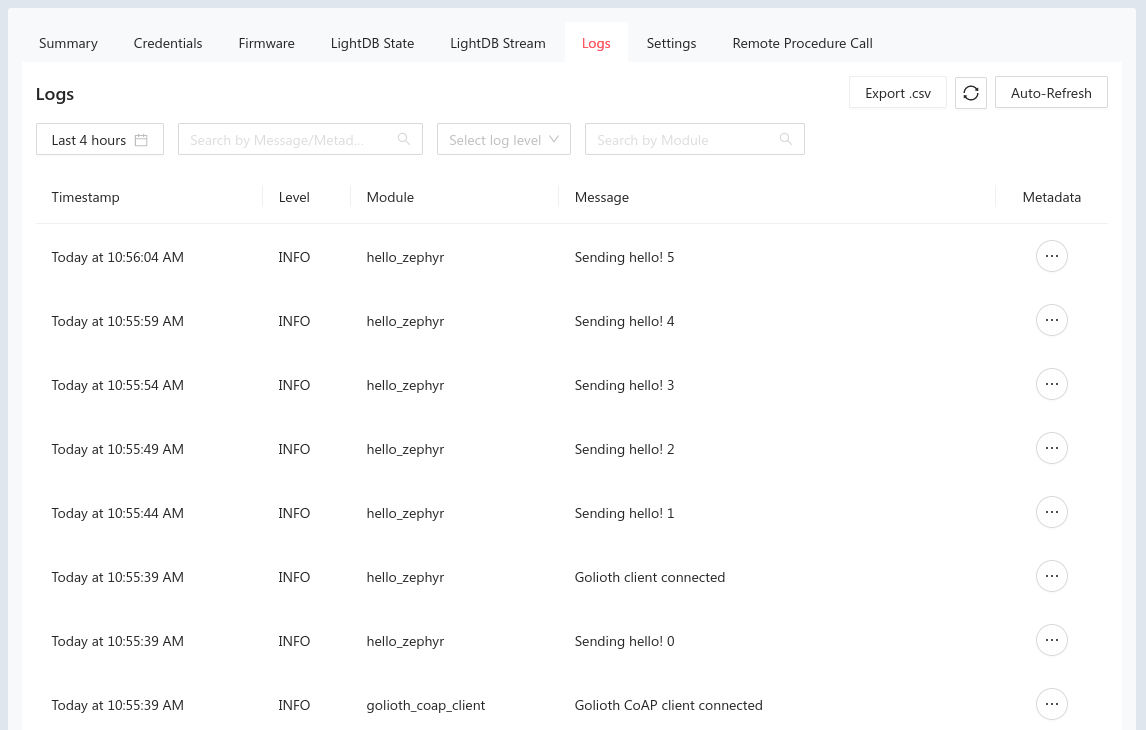
You can confirm this connection by viewing the Status section of the summary page for your device in the Golioth web console. You will also see the hello messages listed in the Log tab:
Additional Golioth Example Code
Congratulations on running the Hello app! The same process may be used to run other Golioth example applications. Be sure to reference the README file for each for detailed configuration and usage information.
- certificate_provisioning: Use certificate authentication
- firmware_update: Use Golioth over-the-air (OTA) firmware update
- hello: Connect and send hello logging messages
- lightdb: Set, get, and observe stateful data between device and cloud
- location: Use network information to determine device location
- logging: Demonstrate logging messages of each different log level
- rpc: Issue a remote procedure call (rpc) and received data back from device
- settings: Demonstrate fleet-wide device settings service
- stream: Send time-series data from device to cloud